This post may contain affiliate links to products or services. I may receive a commission for purchases made through these links with no cost on you. Please read my disclosure for more information.
In this post, we’ll delve into how to create printables using Canva, a popular design tool.
In this digital age, creating visually appealing and functional printable or digital products has become more accessible than ever.
These printables can be used in many projects you might need for your school, organization, or business.
The best part is you can even sell your unique designs on platforms such as Etsy, Shopify, or Redbubble.
With the right tools and a dash of creativity, you can design anything from eye-catching social media graphics to professional-looking business cards.
Among the plethora of design tools available, Canva stands out as a versatile and user-friendly platform that empowers users to bring their ideas to life effortlessly.
WHAT IS CANVA?
Canva is a popular graphic design platform that empowers users to create a wide range of visual content, including presentations, social media graphics, posters, flyers, invitations, and more.
Founded in 2013 by Melanie Perkins, Cliff Obrecht, and Cameron Adams, Canva aims to make design accessible to everyone, regardless of their skill level or background in graphic design.
The platform offers an intuitive drag-and-drop interface, along with a vast library of templates, images, illustrations, icons, and fonts, allowing users to easily customize and create professional-looking designs.
Canva provides both free and premium paid subscription options called Canva Pro.
With Canva, you can collaborate in real time, share designs with your team members or clients, and seamlessly export your creations in various file formats suitable for print or digital use.
Whether you’re a small business owner, marketer, educator, student, or individual looking to create eye-catching visuals, Canva provides the tools and resources to bring your ideas to life efficiently and creatively.
STEPS ON HOW TO CREATE PRINTABLES USING CANVA
What I love about Canva is that it is very user-friendly. And I can testify that even though I don’t have any background in designing, I was able to create printables that I now sell on my Etsy shop.
They are not great but functional and loved by my buyers. Selling printables has become one of my passive income sources. And making these digital products is not as complicated as it seems to be.
Here are the steps on how to create your first printables using Canva:
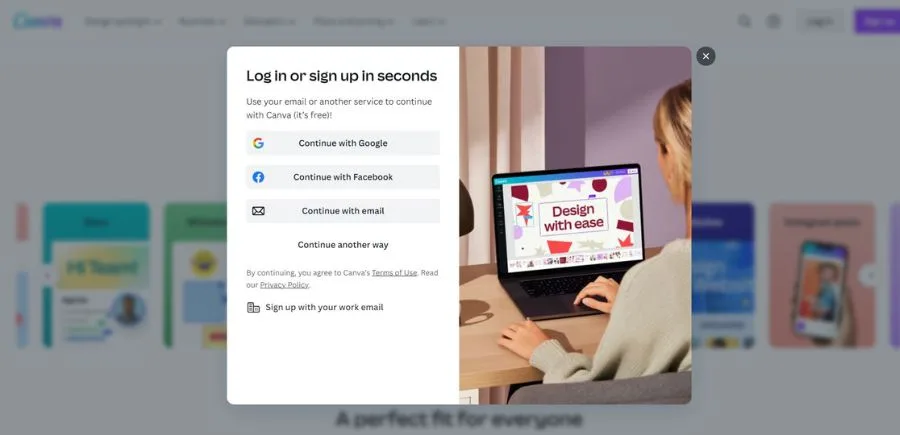
1. Sign Up for a Canva Account
To begin your design journey, visit Canva’s website and sign up for a free Canva account. You can sign up using your email or any other service.
You can already make good designs using the Free Canva account. However, if you want your product to stand out from the competition, you can check out their Canva Pro (paid subscription).
If it is your first time signing up in Canva, they provide a 30-day free trial for Canva Pro. You can check it out and take advantage of its benefits such as:
- access to an extensive library of premium templates, graphics, and illustrations, giving you a wider range of options to choose from.
- create designs with transparent backgrounds, making it easier to integrate your creations seamlessly into various projects.
- advanced features such as resizing designs with a single click, saving you time and effort when adapting your designs for different platforms.
- create brand kits, allowing you to maintain consistency across all your designs by storing brand colors, logos, and fonts in one place.
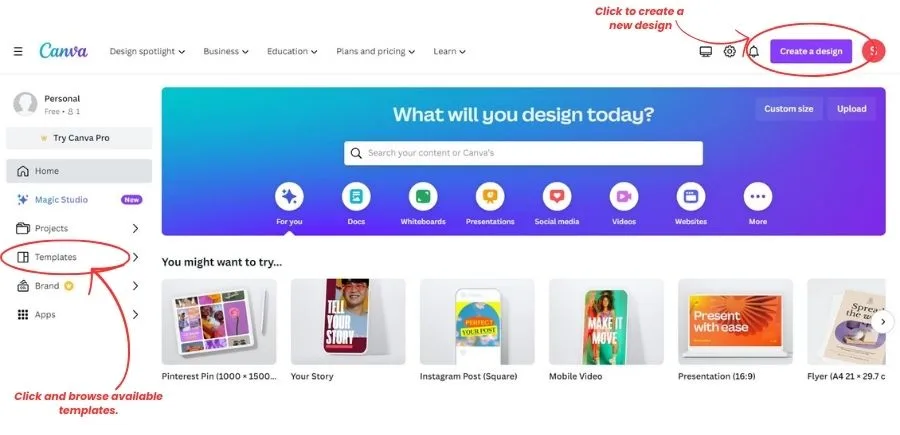
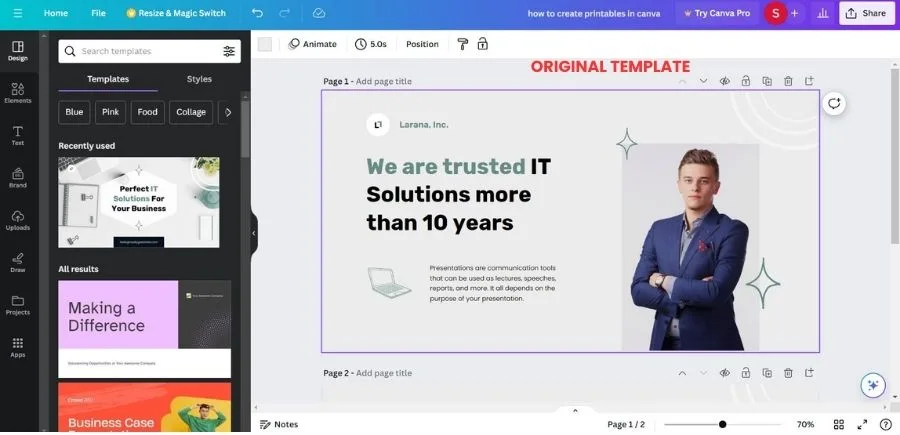
2. Select a Template or Start from Scratch
You have the option to start with a blank canvas or select from a wide range of templates to inspire you.
If you are a beginner in Canva and in designing, I recommend using one of the templates available in their library. It will save you time and are sure that you are using the best sizes that suit your designs.
Once you’re logged in, navigate to the “Templates” section on the left sidebar.
Canva offers a vast array of templates across various categories to cater to different design needs and preferences.
Here are some of the available templates you can find on Canva:
- Business: Documents, presentations, whiteboards, business cards, flyers, prototypes, mind maps, websites, graphs, planners, letterheads, calendars, resumes, invoices, proposals, and reports.
- Social Media Templates: Instagram posts, Instagram stories, Instagram reels, Facebook posts, Facebook covers, Facebook ads, your stories, TikTok videos, Pinterest pins, LinkedIn Video Ads, animated social media and Twitter posts.
- Education Materials: Grade (from Preschool to Grade 12), Subjects, Resource type (lessons, presentations, posters, worksheets and activities, whiteboards, infographics, flashcards, group work, comic strips, graphic organizers, storyboards, story books, websites, videos, daily agendas, newsletters, classroom calendars, class schedules, report cards, lesson plans).
- Video Creation: videos (16:9), Facebook videos, video messages, mobile videos, video collages, YouTube videos, Feed Ad Videos (Portrait).
- Marketing Materials: business cards, flyers, logos, posters, brochures, menus, newsletters, and infographics.
- Print Products: documents and office, photos and gifts, marketing materials, cards and invites, sticker and packaging, clothing, and accessories.
Browse through the available categories or use the search bar to find a specific type of printable template.
Click on a template that suits your needs to begin customizing it.
3. Customize your Printables
Once you’ve chosen a template, personalize the template by replacing the placeholder text, images, and elements with your own content.
Add and Adjust Elements
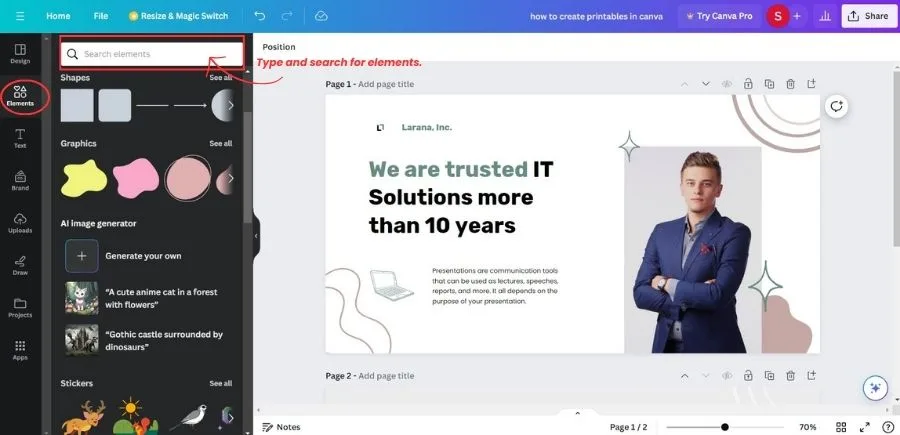
You can add elements such as graphics, shapes, icons, photos, videos, charts, frames, and backgrounds by using the “Elements” tab on the left-hand side of the screen. Simply drag and drop the elements you want to use onto your design.
You can adjust the position, size, and orientation of any element in your design by clicking and dragging it. You can also use the alignment and distribution tools to ensure that your elements are properly aligned.
Another cool new feature of Canva is that you can even generate your element using the AI Image Generator. Isn’t that cool!?
Edit or Add Text
Click on any text box to edit the text. You can change the font style, size, color, alignment, and spacing using the text editing toolbar that appears at the top when you select a text box.
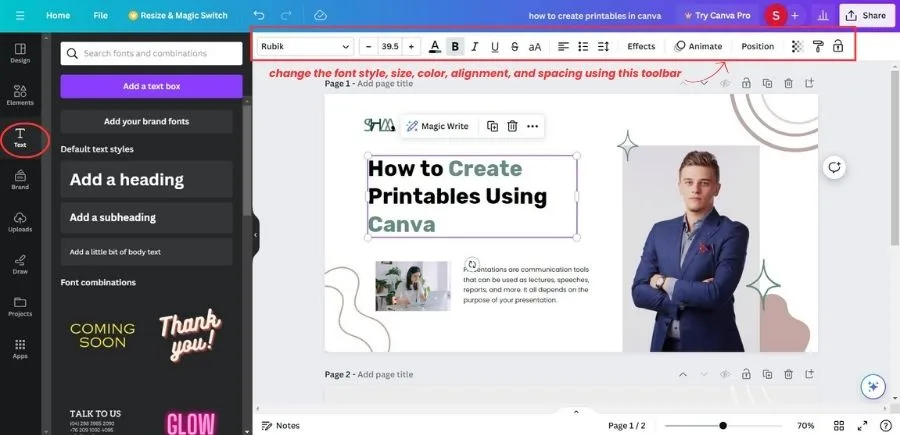
You can also add text by simply copying or duplicating one of the existing text and pasting it. Then edit it as you please.
There are also various font combinations you can get inspiration too.
Customize Images
If you’re using images in your design, you can upload your own images using the “Upload” tab or choose from Canva’s extensive library of stock photos and illustrations in the “Elements” tab.
You can resize, crop, rotate, and apply filters to your images using the editing tools that appear when you select an image.
Use the drag-and-drop functionality to rearrange elements, resize them, or delete unnecessary ones.

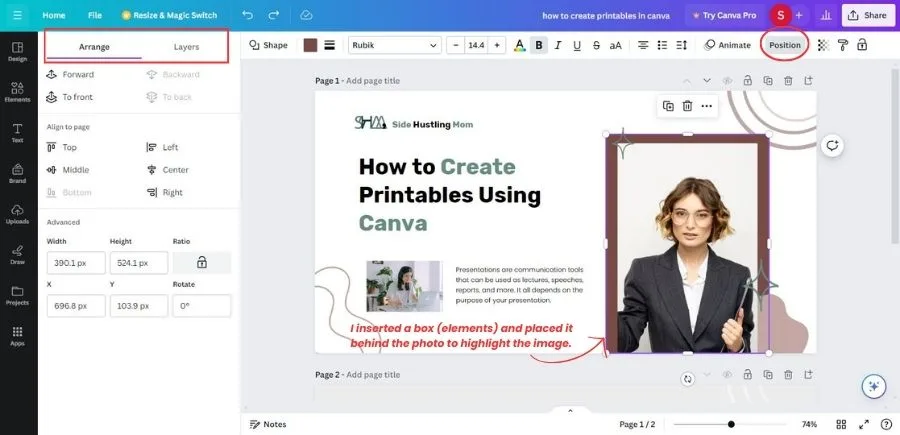
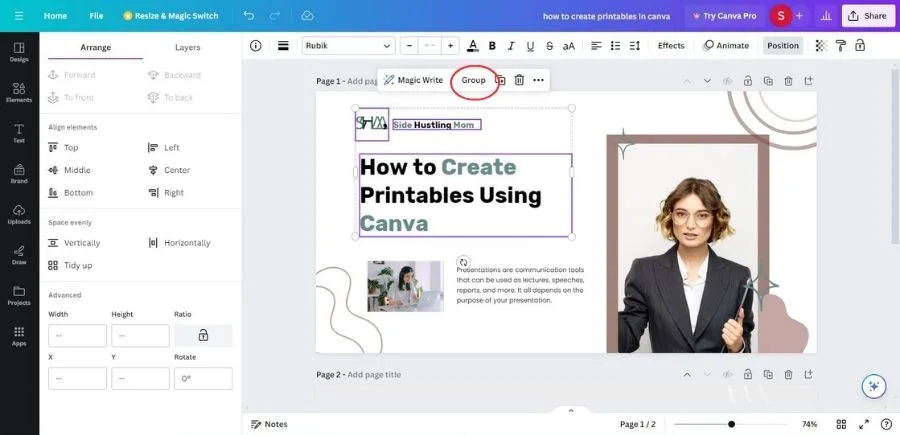
Use Layers
Canva allows you to layer elements on top of each other. You can change the order of layers by clicking on an element and navigating to the top of the page and see the “Position” tab where you can use the “Arrange” & “Layers” options to position the item.
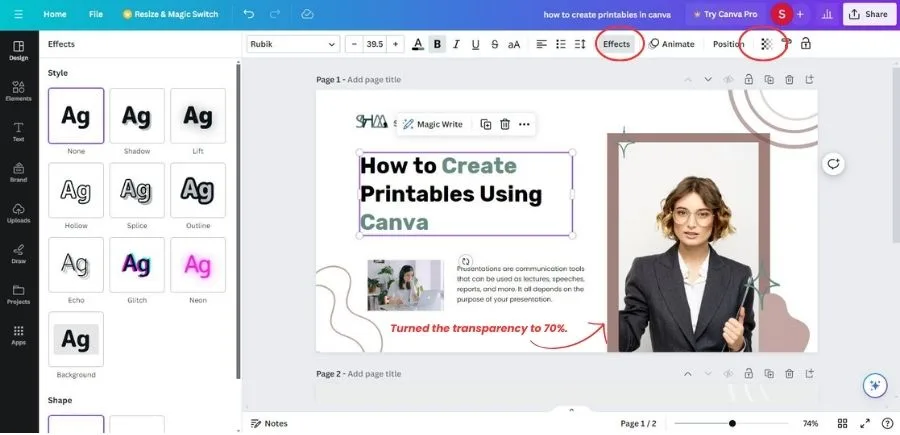
Apply Effects
Canva offers a range of effects that you can apply to your elements, including shadows, glows, and transparency. You can access these effects by selecting an element and clicking on the “Effects” & “Transparency” button in the toolbar.
Grouping items
You can group items by selecting all the items you want to group, then you will see the “Group” in the small dialog box. Grouping items is very helpful when you want to move the items together.
Take some time to explore the various tools, menus, and design elements available.
Once you are familiar with its features, you will get used to it and can design faster and better.
4. Preview and Review
Before finalizing your design, preview it to ensure everything looks as intended.
Review the layout, text, images, and overall composition for any errors or inconsistencies.
Make any necessary adjustments or revisions to refine your design.
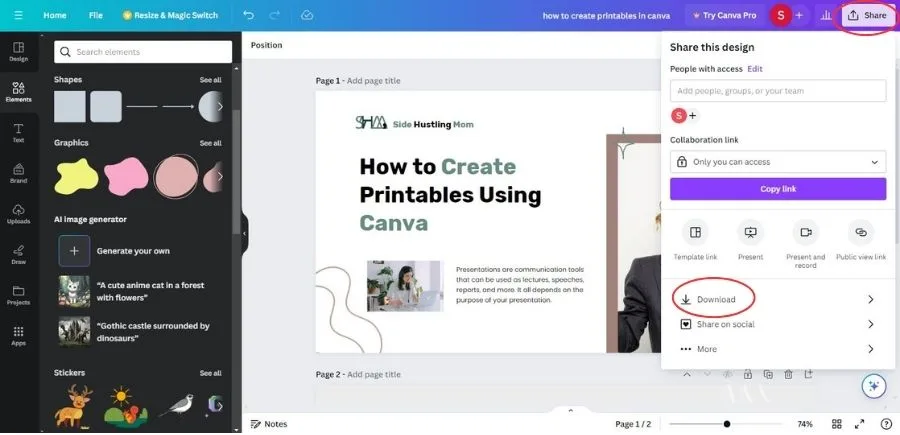
5. Download Your Printable
Once satisfied with your design, you can download it as a printable file.
Click on the “Download” button located at the top right corner of the screen and choose your preferred file format (available files are JPEG, PNG, PDF Standard, PDF Print, SVG, MP4 Video, GIF).
6. Collaborate and Share (Optional)
If you wish to share your printable digitally, you can use Canva’s sharing options to generate a shareable link or publish it directly to social media platforms.
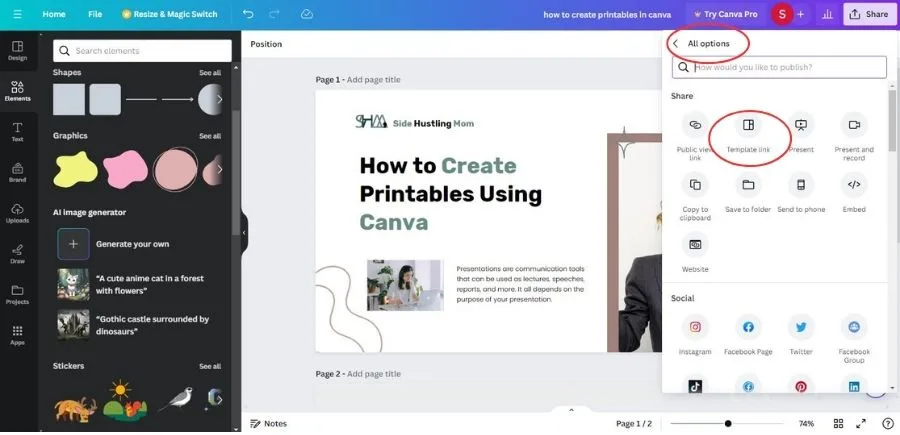
If you’re working on a design with others, you can collaborate in real time by inviting them to view or edit your design. You can also share your design directly from Canva or publish it online.
BONUS: Sell Your Printables on Etsy
If you want to sell your printables, you can check out my post on how to start selling on Etsy and some of the popular digital products to sell on Etsy to get some inspiration.
Here are some quick notes when you sell on Etsy:
- The most common file types for printables are PDF, JPEG, or PNG.
- Offer various sizes that the customer can print. This will make your item saleable rather offering just one size. You can check your competition to get some insights into the several sizes they offer.
- For instant downloads such as printables, you are allowed to upload up to five digital files in your listing. The maximum file size of each file is 20MB.
That’s it! By following these steps, you can easily create custom printables in Canva for either your personal or business use.
TIPS WHEN DESIGNING IN CANVA
There are some things to keep in mind when you create printables in Canva to come up with a beautiful and cohesive design. Here are some tips:
- Use High-Quality Images. You can get free images on sites like pexels.com, pixabay.com, or unsplash.com.
- Don’t Resize Images Disproportionately. Maintain the image aspect ratio to prevent distortion.
- Keep It Simple. Avoid cluttering your design with too many elements or text.
- Don’t Sacrifice Readability. Make sure that the text in your design is easy to read.
- Stay Consistent. Maintain consistency in terms of fonts, colors, and design elements.
- Use White Space and Balance. Don’t overcrowd your design.
- Avoid Overusing Effects. Use effects sparingly and purposefully.
- Customize Templates. Add your own images, adjust text, and modify elements to make your design unique.
- Check Alignment. Ensure that elements are properly aligned within your design.
- Don’t Ignore Copyright. Avoid using copyrighted material without proper authorization, especially if you’re designing it for sale.
CONCLUSION
In conclusion, Canva is a powerhouse tool for creating both printable and digital products with ease and style.
Whether you’re a seasoned designer or a novice, Canva’s user-friendly interface and extensive library of templates make it the perfect companion for bringing your creative visions to life.
So, on your next project or small business, try Canva and unleash the designer in you!
ACTION PLAN
1. Sign up for a Free Canva account.
2. Select a template or make your own from scratch.
3. Start customizing or designing based on your prospective audience and brand.
4. Remember the tips mentioned above while designing.
5. Download, use or share.
5. If you want to sell printables, you can check out these posts to get ideas on how to start selling on Etsy and popular digital products to sell on Etsy.